Alarm system

Did you find the information you were looking for?

If that’s not the case, don’t hesitate to contact us. A member of our team will be happy to assist you as quickly as possible.

Contact us

Guides, tips and documentation

Please refer to the IQ Panel User Guide, your essential resource for setting up your alarm system and managing your alerts with ease. If you have any questions or encounter any issues, our team is here to assist you through our online contact form.

This guide has been specifically designed to help you discover and use all the features offered by IQ Panel. Whether it’s setting up your account, customizing alerts, or managing security settings, you’ll find clear and detailed step-by-step instructions.

IQ Panel User Guide

🛡️ How to Arm Your Qolsys DSC Alarm System – A Simple User Guide

Leaving home? Heading to bed? Arming your Qolsys DSC alarm panel is a quick and easy way to protect your property and enjoy peace of mind. Whether you’re staying in or going out, your panel gives you flexible arming options to match your routine.

Here’s a clear step-by-step guide to arming your alarm system.

What Does It Mean to “Arm the System”?

Arming your alarm activates your intrusion sensors. Once armed, the system monitors doors, windows, and motion detectors depending on the selected mode.

👇 How to Arm Your Qolsys DSC Panel

  1. Tap the screen to wake up the panel
    If the display is off, simply touch the screen to activate it. Tap on the padlock beside the written text : SYSTEM DISARMED
  2. Select your arming mode:
    You’ll see three main options:
    • Arm Away:
      Best when nobody is home.
      🎯 Activates door/window contacts + motion sensors.
    • Arm Stay:
      Ideal when you’re staying inside.
      🎯 Motion detectors are disabled, but entry sensors remain active.
    • Arm Night (optional):
      For extra protection while sleeping.
      🎯 May include select motion zones depending on how your system is configured.
  3. Enter your user code (if required)
    Some systems may prompt for your code to confirm arming.
  4. Wait for the countdown
    The panel will beep and start a short exit delay (usually 30 seconds) before the system becomes fully armed.

🔄 How to Disarm the System

When you return home, tap “Disarm”, enter your user code, and the system will deactivate before any alarms are triggered.

📱 Pro Tip: Use the Mobile App to Arm Remotely

With your connected Qolsys app (such as Alarm.com), you can:

  • Arm or disarm your system from anywhere
  • Receive real-time alerts
  • Check system status on the go

📌 Why Arm Your System Regularly?

  • Keep your home protected 24/7
  • Deter intrusions and break-ins
  • Stay informed with smart notifications
  • Give your family peace of mind

👨‍💻 Need Help?

Have questions or need assistance with your panel? The TAZ Alarme team is here to help, whether remotely or on-site. Don’t hesitate to contact us.

🔓 How to Disarm Your Qolsys DSC Alarm System (Away or Stay Mode) – Easy User Guide

Coming home or opening your business? The first thing to do is disarm your Qolsys DSC alarm panel to avoid any false alarms. Whether your system is armed in Away Mode or Stay Mode, the disarming process is quick and easy.

Here’s a step-by-step guide to disarming your panel like a pro.

🧭 What Does “Disarm” Mean?

Disarming your system means turning off intrusion detection — including motion detectors and door/window sensors — so you can move freely inside without triggering an alarm.

🔹 How to Disarm in Away Mode (Arm Away)

This mode is used when nobody is on the premises — for example, when leaving your home or business. All sensors, including motion detectors, are active.

👉 Steps:

  1. Enter the premises
    Open the designated entry door. The panel will start a countdown timer (usually 30 seconds).
  2. Wake the screen (if needed)
    The screen may light up automatically. If not, just tap it.
  3. Press “Disarm”
  4. Enter your user code
    Input your 4- or 6-digit code.
    ✅ A confirmation will appear on-screen once the system is disarmed.

🔹 How to Disarm in Stay Mode (Arm Stay)

This mode is used when you’re staying inside, like during the night or daytime. Only door and window sensors are active — motion detectors are disabled.

👉 Steps:

  1. Tap the panel screen
    If you haven’t triggered the system (e.g., no door opened), just wake the screen manually.
  2. Select “Disarm”
  3. Enter your user code

The process is the same as Away Mode, but there’s no countdown or immediate alarm risk if you’re moving inside.

📱 Bonus: Disarm Remotely with Your Mobile App

With your Qolsys-connected app (like Alarm.com), you can:

  • Disarm before you walk in
  • Get real-time disarm notifications
  • See who disarmed the system (by code or user name)

🚨 What Happens If You Don’t Disarm in Time?

  • The alarm will sound once the entry delay expires (in Away mode).
  • You’ll receive a notification or call depending on your setup.
  • Your monitoring station (if active) may be alerted.

🛡️ Why It’s Important to Disarm Properly

  • Avoid false alarms
  • Prevent stress or emergency dispatches
  • Maintain smooth monitoring service
  • Keep your home or workplace calm and secure

👨‍💻 Need Help?

Forgot your code? Panel not responding? TAZ Alarme is here to help, with remote or in-person support whenever you need it.

🔐 How to Change a User Code on Your Qolsys DSC Panel – Simple Step-by-Step Guide

Need to change a user code on your Qolsys DSC alarm system? Whether you’re updating an old code, adding a new family member, or removing someone who no longer needs access, the process is quick and easy — and you don’t need a technician to do it.

Here’s how you can manage your user codes on your own.

👣 Step-by-Step: Change a User Code on Qolsys DSC

  1. Open the settings menu:
    • Swipe your finger on the touchscreen from the top to the bottom, starting under the camera on your panel. A new menu will show up.
    • From the home screen of your Qolsys panel, tap the settings gear icon (⚙️).
  2. Enter your master code:
    • Select “Advanced Settings”.
    • Enter your master code (this is your main security code).
  3. Go to User Management:
    • Tap “Users” to see a list of all programmed user codes.
    • Each code is labeled by name or user number.
  4. Edit the user code:
    • Choose the user you want to modify.
    • Tap “Edit”, then enter the new 4- or 6-digit access code.
    • Confirm and save your changes.
  5. (Optional) Remove a user:
    • To delete a code, simply tap “Delete” next to the corresponding user.

ℹ️ Helpful Tips:

  • Most Qolsys panels support up to 242 user codes, depending on your model.
  • It’s a good idea to update user codes regularly, especially after someone moves out or changes roles.
  • The master code cannot be deleted — it’s required to control user access.

Why Manage Your Alarm Codes?

Keeping your user codes up to date allows you to:

  • Maintain control over who can arm/disarm the system 🧠
  • Increase the overall security of your home 🔐
  • Track activity through the mobile app or system logs 📲

👨‍💻 Need Assistance?

If you’re having trouble or have questions, our TAZ Alarme support team is here to help — remotely or on-site. Don’t hesitate to reach out!

🔐 How to Set Up a Duress Code on the IQ Panel 4 – User Guide

A duress code is a secret code you can use to disarm your Qolsys IQ Panel 4 under pressure without alerting an intruder. When entered, it silently sends an alarm signal to your monitoring service, ensuring your safety in emergency situations.

Here’s a simple step-by-step guide to set up your duress code directly from your panel.

⚙️ Steps to Set Up a Duress Code on the IQ Panel 4

  1. Turn on your IQ Panel 4 and go to the home screen.
  2. Open the Settings menu.
  3. Select Users.
  4. Choose the user account for which you want to set the duress code (usually your own).
  5. Tap on Set Duress Code.
  6. Enter a new 4 or 6-digit duress code (different from your main code).
  7. Confirm the code by entering it again.
  8. Save your changes.

💡 User Tips for the Duress Code

  • Pick a code that’s easy for you to remember but hard for others to guess.
  • Avoid using a code too similar to your primary code.
  • Test the duress code with your monitoring service to ensure silent alerts are received correctly.

🔔 Why Use a Duress Code?

  • To silently alert authorities during a forced disarm situation
  • To protect your family and property discreetly
  • To ensure a fast emergency response without tipping off an intruder

🛠️ Need Help Setting Up Your Duress Code?

If you don’t see this option or have difficulties, contact TAZ Alarme. Our team can guide you step-by-step or configure it remotely for you.

📶 How to Change the Wi-Fi on Your Qolsys DSC Panel – Simple User Guide

Did you change your router, update your Wi-Fi password, or switch internet providers? If so, you’ll need to reconnect your Qolsys DSC alarm system to the new Wi-Fi network to make sure it stays connected and functional.

Here’s an easy step-by-step guide for non-technical users on how to update your Qolsys panel’s Wi-Fi settings.

🔄 Steps to Reconnect Your Qolsys DSC Panel to Wi-Fi

  1. Open the panel settings:
    • Swipe your finger on the touchscreen from the top to the bottom, starting under the camera on your panel. A new menu will show up.
    • Tap the gear icon (⚙️) on the home screen of your Qolsys panel.
    • Select “Advanced Settings”.
    • Enter your master code (the same one you use to arm or disarm the system).
  2. Access the Wi-Fi menu:
    • In the Advanced Settings, tap “Wi-Fi”.
    • The panel will display a list of available wireless networks.
  3. Select your new Wi-Fi network:
    • Tap your network name (SSID) from the list.
    • Enter your Wi-Fi password carefully (it’s case-sensitive).
    • Tap “Connect”.
  4. Confirm the connection:
    • If the connection is successful, the status will show as “Connected”.
    • You can now return to the home screen—your system is back online.

📌 A Few Important Tips:

  • Qolsys panels work best with 2.4 GHz Wi-Fi (not 5 GHz).
  • If you don’t see your network, try restarting your panel and router.
  • Make sure your Wi-Fi signal is strong where the panel is installed.

🔍 Why Is Wi-Fi Important for Your Alarm System?

Keeping your Qolsys DSC panel connected to Wi-Fi allows:

  • Fast transmission of alarms and notifications 📡
  • Remote control via the mobile app 📱
  • Automatic system updates for better performance 🔄

🛠 Need Help?

If you’re having trouble reconnecting your panel, our technical support team is ready to help—remotely or on-site. Don’t hesitate to contact us for assistance.

🔄 How to Bypass a Sensor on the IQ Panel 4 – Simple User Guide

Sometimes, you may need to temporarily bypass a sensor on your Qolsys IQ Panel 4 system—for example, if a door is left open while you want to arm the system, or if a sensor is malfunctioning.

Here’s a simple step-by-step guide to bypass a sensor directly from your panel without needing a technician.

⚠️ What Does It Mean to Bypass a Sensor?

Bypassing a sensor means temporarily disabling its monitoring so it won’t trigger an alarm if it’s activated.

🛠️ Steps to Bypass a Sensor on the IQ Panel 4

  1. Turn on your IQ Panel 4 and go to the home screen.
  2. Tap the Security or Arm/Disarm icon.
  3. Before arming your system, select the Bypass option.
  4. A list of all connected sensors will appear.
  5. Check the sensors you want to bypass (e.g., an open door or window).
  6. Confirm your selection by tapping OK or Save.
  7. Arm your system normally (Stay or Away mode).
  8. The bypassed sensors will remain inactive while the system is armed.

💡 User Tips

  • Use bypass cautiously: never leave critical sensors bypassed longer than necessary.
  • Always check sensor status before bypassing for your security.
  • Remove the bypass as soon as possible through the same menu.

⚙️ What If You Don’t See the Bypass Option?

Depending on your panel setup or user permissions, this option might be locked.

Solution:
Contact your system administrator or TAZ Alarme for help enabling this feature or bypassing the sensor.

🔐 Why Bypass a Sensor?

  • Allows arming your system even if a door/window is temporarily open
  • Prevents false alarms caused by a faulty sensor

Facilitates maintenance or movement in a monitored area without triggering alarms

How to Run a System Test on Your Qolsys IQ Panel 4 – Simple User Guide

Wondering if your alarm system is working correctly? The Qolsys IQ Panel 4 makes it easy for users to run a system test and check the health of sensors, network connectivity, and communication with the monitoring center — all in just a few taps.

Here’s a step-by-step guide to help you test your system like a pro.

🔍 Why Run a System Test?

Running a regular system test allows you to:

  • Confirm all sensors (door/window, motion, smoke, etc.) are working
  • Check your Wi-Fi and cellular connection
  • Ensure your system can communicate with the monitoring station
  • Prevent false alarms or missed emergencies

🔄 Best practice: Run a test at least once per month or after any service change or power outage.

🛠️ Steps to Run a System Test on the IQ Panel 4

  1. 📱 Open the Settings Menu
  • Tap the gray bar at the top of the home screen
  • Tap Settings
  • Select Advanced Settings
  • Enter your master user code (or installer code if you have it)
  1. 🧪 Select “System Tests”
  • Once inside the Advanced Settings menu, tap System Tests
  • You’ll see various test options, including:
    • Cellular Test
    • Wi-Fi Test
    • Z-Wave Test
    • Sensor Test
    • Panel Siren Test
    • Microphone & Speaker Test
  1. ✅ Run Each Test
  • Tap each test to begin. The system will automatically check the functionality and display a pass or fail result.
  • For the Sensor Test, you may be asked to activate (open/close) doors, windows, or motion sensors to confirm they’re being detected.
  1. 🔔 Optional: Trigger a Live Alarm Test

If you’d like to test the alarm sound and monitoring station response:

  • Arm the system in Stay or Away mode
  • Trigger a sensor (e.g., open a door)
  • Wait to see if the alarm activates and if a notification is sent

⚠️ Important: Before doing this, always call your monitoring center to let them know you are running a test — to avoid dispatching emergency services by accident.

  1. 📊 Review the Results
  • If all tests pass, your system is working as expected.
  • If a sensor or connection fails, it could be due to a low battery, weak signal, or a device issue.

🧰 Need Help Interpreting the Results?

If you’re unsure about the test results, or a sensor keeps failing, TAZ Alarme is here to help — remotely or on-site. Don’t hesitate to contact us for assistance.

💡 Bonus Tip: Set a Monthly Reminder

Use your phone or the Alarm.com app to schedule a monthly system check — it takes just a few minutes and gives you peace of mind year-round.

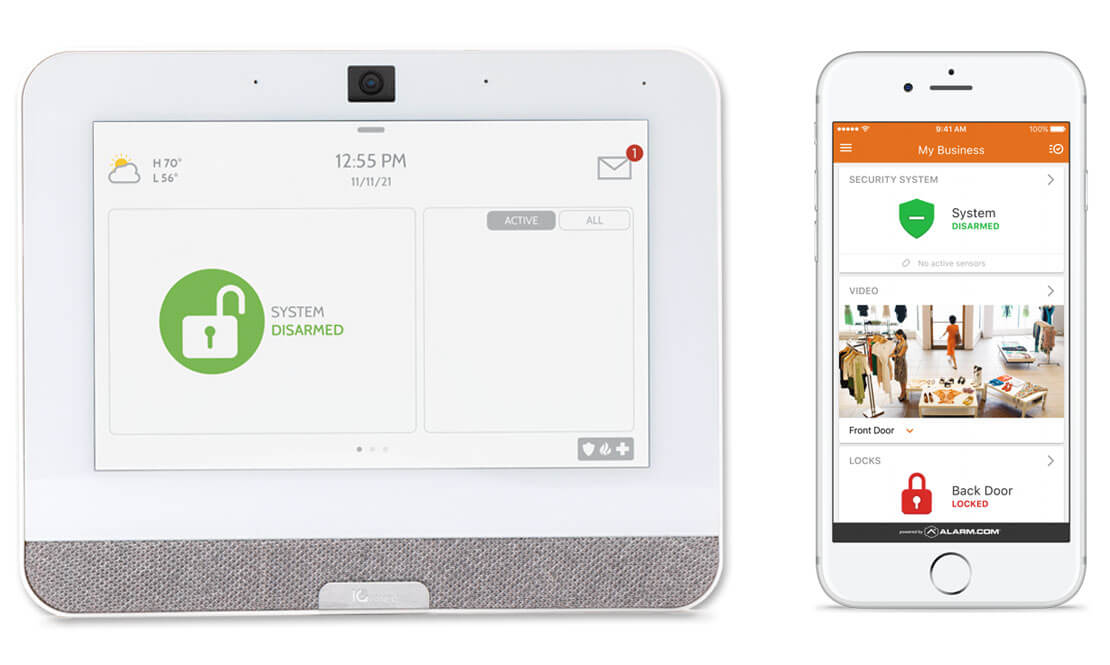
🖥️ Why Is My IQ Panel 4 Screen Blank or Black? (User-Friendly Explanation)

Have you noticed that your Qolsys IQ Panel 4 screen is black or unresponsive? Don’t worry. In most cases, this issue is easy to fix and doesn’t mean your system is broken.

Here are the main reasons your screen might appear blank, along with simple solutions to try before calling a technician.

🔋 1. The Panel Is in Sleep Mode (Power Saving)

The IQ Panel 4 is designed to turn off its screen automatically after a period of inactivity to save power while keeping the system running in the background.

Solution: Simply tap the screen to wake it up.
If nothing happens, move on to the next step.

🔌 2. Power Supply or Battery Is Low

A black screen can also indicate a loss of power. The panel runs on a backup battery, but if it’s drained, the screen may stay off.

Solution:

  • Make sure the transformer is plugged into a working outlet.
  • Check that the power cable is not damaged or disconnected.
  • If there was a recent power outage, wait a few minutes for the battery to recharge.

🔄 3. The System Is Restarting or Updating

The screen may stay black during a software restart or automatic update. This process can take up to 5 minutes depending on the situation.

Solution: Be patient. If the screen remains black after 10 minutes, try a manual restart.

🔘 4. Press the Power Button

If the screen still doesn’t respond, briefly press the power button located on the side of the panel.

Tip: Hold the button for 10 seconds to force a restart.

⚠️ 5. Possible Screen or Hardware Issue

If none of the above steps work, the touchscreen or internal hardware may be faulty. Luckily, this is rare.

Solution: Contact TAZ Alarme for technical support or possible replacement.

📞 Need Help Fast?

At TAZ Alarme, we understand that your security can’t wait. Contact us for a quick remote diagnosis or an on-site visit if needed.

📟 How Many Sensors Can My IQ Panel 4 Support? (User-Friendly Explanation)

Wondering how many sensors your Qolsys IQ Panel 4 can handle? This is a common question when planning the security coverage for your home or business.

Here’s what you need to know to get the most out of your system.

🛡️ Maximum Sensor Capacity of the IQ Panel 4

The IQ Panel 4 is a high-performance security system compatible with many types of wireless and wired sensors.

  • Maximum number of wireless sensors (via S-Line & PowerG):
    You can register up to 160 wireless sensors on a single IQ Panel 4, including door/window contacts, motion detectors, smoke and CO sensors, flood detectors, and more.
  • Wired sensors (with additional modules):
    By integrating compatible wired modules, you can connect dozens of additional wired sensors, depending on your setup.

🔧 Why Does Sensor Capacity Matter?

The more sensors you can connect, the better your system can cover every vulnerable point in your property — ensuring complete and reliable protection.

💡 User Tip

  • Make a list of all areas to secure (doors, windows, garage, basement, etc.).
  • Don’t forget smoke and carbon monoxide detectors.
  • Consult with TAZ Alarme experts to optimize your sensor choice and quantity.

🛠️ Expansion and Compatibility

The IQ Panel 4 supports PowerG and S-Line technologies for extended range and longer battery life. These protocols offer secure and reliable communication, even with a large number of devices.

Need help choosing sensors or setting up your system? Contact TAZ Alarme, your trusted security expert. We’re here to help you protect your space efficiently.

Check out our Blog

Explore our blog articles, filled with practical solutions, expert tips, and advice.

Business Security Cameras

In today’s fast-paced world, business security cameras are essential for safeguarding commercial establishments against potential [...]

Surveillance Camera: Protect Your Business Today

Ensure your business remains protected with the right surveillance camera designed for superior security and [...]

Business Alarm Systems: A Smart Investment for Your Business Security

Protect your business with a reliable Business Alarm System designed to keep your assets safe [...]

Access control system: Installation and pricing

Access control systems play a crucial role in securing premises, whether for businesses, public institutions [...]

Video surveillance system installation and pricing: commercial, industrial and construction sectors

Installing a video surveillance system is an essential security measure for commercial, industrial and construction [...]

Installation and cost of a commercial alarm system

Installing a commercial alarm system is essential to ensuring business security against intrusion, vandalism and [...]

How does remote video surveillance improve safety on construction sites?

Imagine a bustling construction site. Heavy machinery roars, workers navigate uneven terrain and expensive materials [...]